How to Plumb a Water Softener: Step by Step Guide with Diagram
To plumb a water softener, you cut into the main cold water line after the shutoff valve and before the water heater. You then connect the pipes to the softener’s bypass valve, run a drain hose to an approved drain with an air gap, and flush the system. Most handy homeowners can do it in about a day.
This guide shows you the layout, the parts and the steps. It also covers the drain rules that trip up most installs, and when it’s smarter to call a plumber.
Where Should a Water Softener Go in Your Plumbing?
Put the softener near where the main water line enters your home. It should sit after the main shutoff valve and before the water heater, so both hot and cold water get softened. Outdoor faucets and irrigation lines should branch off before the softener, so you don’t waste soft water on the lawn.
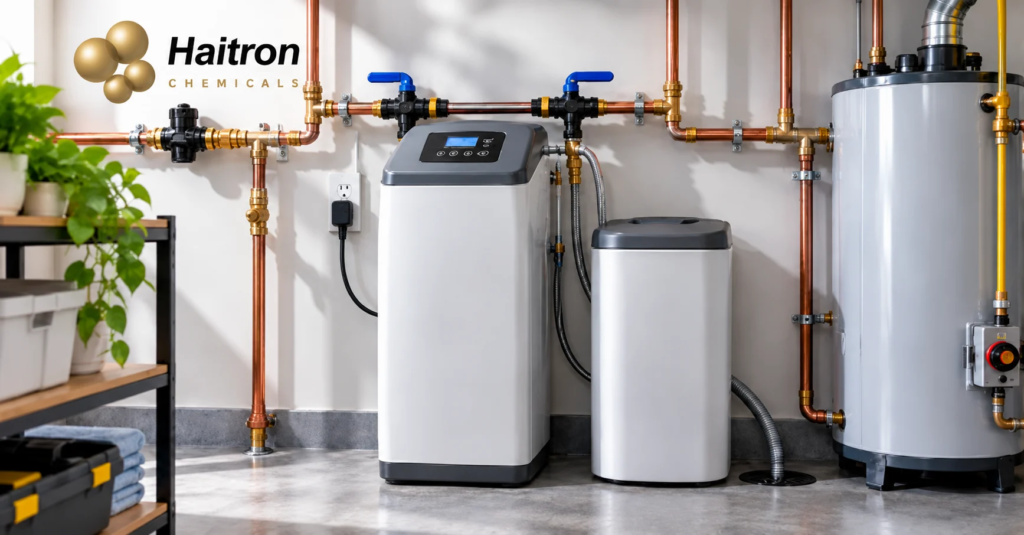
Here’s a simple water softener plumbing diagram:
Main line → Main shutoff → Tee to outdoor faucets (hard water) → Bypass valve → Softener → Bypass valve → Water heater and house (soft water)
On a private well, the softener goes after the pressure tank. Many newer homes already have a “loop,” which is a pre-plumbed pair of pipes near the water heater for this exact job. If yours has one, the install gets much easier.
What Do You Need for Water Softener Installation?
You need a few basic tools and parts. Gather them before you shut off the water:
- Pipe cutter or tubing cutter
- Fittings that match your pipe (copper, PEX or CPVC)
- Bypass valve (most softeners include one)
- Drain hose, hose clamp and an air gap fitting
- Bucket, towels and Teflon tape
- A nearby electrical outlet for the control valve
Check your pipe size too. Most homes use 3/4 inch or 1 inch lines. Your softener fittings must match, or you’ll need adapters.
Which Connection Method Should You Use?
Your pipe type decides how you’ll connect a water softener. Here’s how the common options compare:
| Connection method | Skill level | Tools needed | Best for | Watch out for |
|---|---|---|---|---|
| Copper sweat (soldered) | High | Torch, solder, flux | Existing copper lines | Heat can melt plastic parts |
| PEX crimp or expansion | Medium | Crimp or expansion tool | Most DIY installs | Needs the right fittings |
| Push fit fittings | Low | Cutter, deburr tool | Quick repairs, beginners | Costs more per fitting |
| Flexible braided connectors | Low | Wrenches | Tight spaces, less vibration | Must be rated for main line pressure |
| CPVC solvent weld | Medium | Primer, cement | Existing CPVC homes | Needs cure time before pressure |
One tip helps a lot with copper. Solder any fittings and nipples before you attach them to the plastic bypass valve, because the heat from soldering can damage the plastic.
How to Plumb a Water Softener Step by Step
Here are the steps in order:
- Turn off the main water supply, then switch off power or gas to the water heater.
- Open a low faucet to drain the lines. Keep a bucket under your cut point.
- Set the softener in place, close to the main line and level on the floor.
- Attach the bypass valve. Grease its O rings with silicone, push it into the softener valve, and snap the clips into place.
- Cut the main line and fit the inlet (hard water in) and outlet (soft water out). Arrows on the valve show the flow direction.
- Connect the drain hose to the valve’s drain port and secure it with a clamp.
- Connect the brine tank overflow hose and run it to a drain below the overflow fitting. It works by gravity.
- Put the softener in bypass, turn the water back on, and open a faucet to push out air.
- Slowly move the valve to service. Check every joint for leaks.
- Add salt, set the hardness and time on the control head, and restore power to the water heater.
Some manufacturers also want you to sanitize the system before first use. Always read your manual.
What Are the Water Softener Drain Line Rules?
Your water softener drain line must end above the drain with an open air gap, so it’s never sealed directly into a sewer pipe. The gap stops dirty water from being sucked back into your drinking water. Rules vary by state, so check your local plumbing code before you finish the drain.
Think of a garden hose sitting in a muddy bucket. If pressure drops, it can siphon that mud back. The air gap keeps the hose out of the bucket.
Codes differ on the size of the gap. Illinois, for example, requires a vertical gap of at least twice the pipe diameter and never less than 2 inches. The Minnesota Department of Health lists a softener drain plumbed straight to a sewer, or dropped into a floor drain or sink with no gap, as an unprotected connection.
Common water softener drain options include:
- A floor drain, with an air gap
- A laundry standpipe, with an air gap fitting
- A utility sink, with the hose clipped above the rim
Common Mistakes to Avoid
These are the errors that cause most callbacks:
- Installing the inlet and outlet backwards. Always follow the flow arrows.
- Softening the outdoor faucets. It wastes salt and water on plants.
- Skipping the bypass. Without one, any repair means shutting off water to the whole house.
- Pushing the drain hose into a drainpipe with no air gap.
- Kinking or running the drain hose too far or too high. Follow your manual’s length and height limits.
- Forgetting the resin itself. The strong acid cation resin inside the tank does the softening, so a worn out bed will fail even on a perfect install.
What Are the Limitations of DIY Installation?
Knowing how to plumb a water softener doesn’t make every install a DIY job. Some states require a licensed plumber. Massachusetts is one example. Soldering near walls carries a fire risk, and old galvanized pipes can crack when you cut them.
A softener also won’t fix every water problem. It doesn’t remove lead, so you’d need a certified lead filter for water for that. Chlorine taste and odor call for a GAC water filter. On well water, iron or sediment may need a prefilter before the softener.
Final Thoughts
Plan the layout first, keep outdoor lines on hard water, and never skip the bypass or the air gap. Do those three things right and you’ll know how to plumb a water softener that runs leak free for years.
Your next step is to check your local plumbing code on drain air gaps before you buy fittings. Curious how ion exchange works beyond the home? See our water treatment applications.
FAQs
How long does water softener installation take?
Family Handyman rates the job at about a full day for someone with intermediate skills. A home with a pre-plumbed loop usually goes much faster.
Does a water softener need electricity?
Most modern control valves plug into a standard household outlet to run the timer or meter. Check your model’s manual, and plan for an outlet near the softener.
Can I put a softener in the garage?
Yes. Garages are a common spot for pre-plumbed loops. Keep the unit out of direct sun and away from freezing temperatures, or use an insulated enclosure.
Should toilets get soft water?
They don’t need it. If your loop already feeds them, there’s no reason to change it. Many people simply leave them on whatever line is easiest.
Does Haitron make resin for home water softeners?
Yes. Haitron manufactures strong acid cation resin used for water softening, along with other ion exchange resins. You can request a quote through the contact page.